I have to admit that MacOS is a great platform, nearly all of the apps I use day to day, work on MacOS beautifully and it is a pleasure to use the OS itself. Macs are expensive, but they are great machines if you are looking for something portable and have a great battery life. On the other hand, Windows is a huge platform that you can’t ignore. Most games are not available on MacOS or performance is worse than Windows. And there are some programs that only work on Windows.
Macs can run Windows, you can simply use the Bootcamp Assistant, partition your hard drive, select the ISO and install Windows. But you will lose some of your valuable disk space, and Windows takes around 20 GB of space for itself. You need to spare more for games and apps. So, there are two reasonable options, you need to pay extra for more space on your Mac. (If you have already purchased, I’m sorry, you can’t to that) or install Windows to a separate removable disk. Let’s talk about the second option.
Installing Windows 10 to an external HDD with Rufus (First Method)
That’s a piece of cake if you have a compatible portable USB disk (preferably USB 3.0 or USB-C) lying around. A portable HDD which is >500GB is probably compatible. I suggest trying this method and if you are unsuccessful, continue reading the second method.
First, download 64bit Windows 10 ISO from Microsoft: Click here to download Windows 10 ISO If you are accessing the page from a Mac or Linux computer, you will be able the download ISO directly, if you are on a Windows machine, change your browser’s user agent or use Windows Media Creation Tool to create installation ISO.
Rufus is a great tool for creating portable Windows and Linux installation disks. Download latest version of Rufus from here.
Open it on a Windows machine or Windows VM. Connect your disk directly to the Windows Machine.
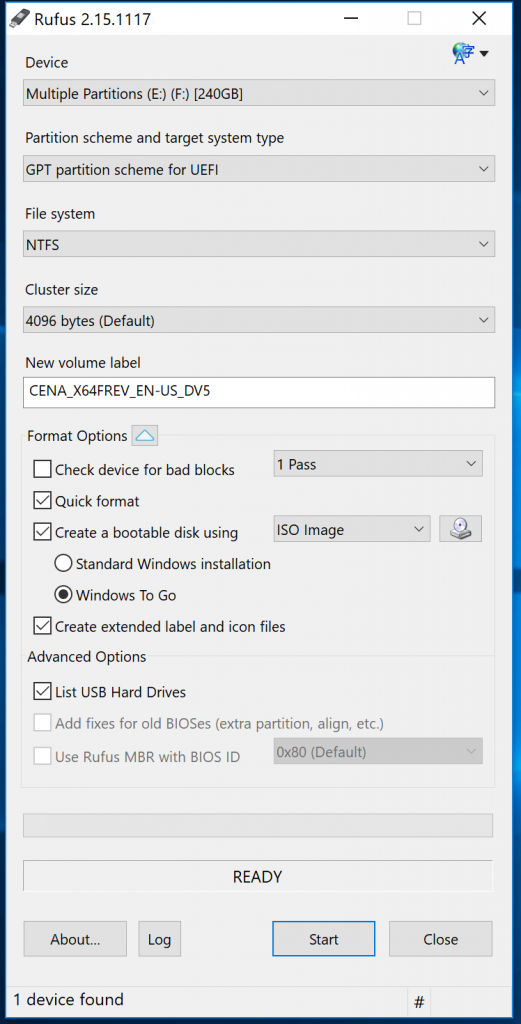
First, you need the click the little arrow near the Format Options and enable List USB Hard Drives option.Select your target USB disk.
Click the CD/DVD icon near the Create a bootable disk using option and select the Windows ISO you have downloaded. Select Windows to Go.
As Partition scheme and target system type, select GPT Partition Scheme For UEFI. The file system should be NTFS. Finally, click start.
Older Macs can boot from MBR disks so you can try options other than GPT and UEFI.
After the process is completed keep Option key pressed when you power on your Mac and select the external disk to boot from.
Installing Windows 10 on an External USB Disk That Does Not Have FIXED Flag. (Second Method)
I bought a portable SSD (to be specific: Sandisk Extreme 500 – 240GB) to use as a portable Windows To Go disk.
I tried the first method, but Rufus warned me that the disk is not FIXED but flagged as REMOVABLE. Rufus suggested me to use MBR partition scheme because Windows To Go does not support booting from GPT disks if they have removable hardware flag.
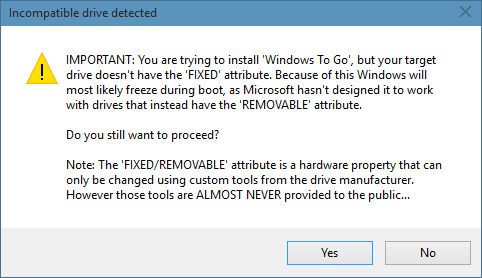
If you also see “You are trying yo install ‘Windows To Go’, but your target drive doesn’t have the ‘FIXED’ attribute” warning, the USB disk probably won’t boot on newer Macs. Because Apple’s firmware on newer Apple Macs does not boot from MBR disks that have more than one partition. Apple basically wants you to use GPT for bootable OS drives. (GPT is newer and a modern technology, so it is reasonable)
I thought that I wasted $70 for an SSD disk that I won’t use. I should probably return it. There was no proper way suggesting to make it work on the Internet. But later, I came up with an idea of installing Windows within a virtual machine that directly writing to the disk. Virtualization software can make Windows installation to see the disk as fixed. And it WORKED!
I summed up the process, it might be useful to give it a try. It might help you to install Windows 10 as Windows To Go on removable flash disks, USB SSDs and memory cards. And you can boot on Apple Macs and most PC’s with UEFI enabled firmware.
Installing a Virtualization Software
On the MacOS, main virtualization software options for running Windows in a virtual machine are Parallels Desktop, VMWare Fusion, and Oracle VirtualBox.
VirtualBox is a free and open source tool, you can download it from the official website. Just download and install the OS X version and restart your Mac.
You can also download and use VMWare Fusion (30-day trial) from VMware website. It is generally faster but if you do not use the disk on MacOS it does not matter.
I don’t have a license for Parallels Desktop, therefore I can’t explain how you can use it for this process.
Prepare the Disk and Necessary Tools
Backup the data on your portable SSD (or HDD) before, we will format it.
You will need a 64bit Windows 10 ISO file Click here to download Windows 10 ISO from Microsoft
I have used Windows 10 Enterprise version 1703 (Creators Update) older versions might not work. (But other versions of Windows – Home, Pro or Single Language – should work as well.)
I have used VMware Fusion 8.5 and Oracle Virtualbox 5.1, settings might change in the future.
I have tried this on MacOS Sierra 10.12.5 and Macbook Pro 2016.
I suggest disabling your NTFS support tools if installed (such as Paragon NTFS for Mac) temporarily. It might interfere with the progress.
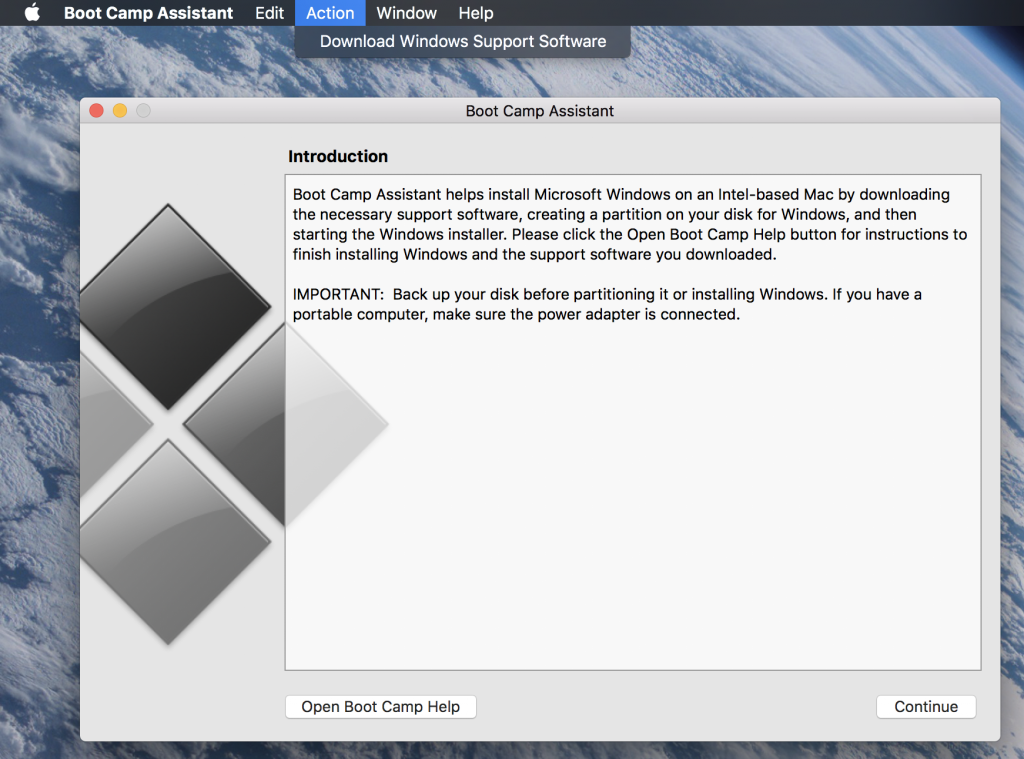
Open Boot Camp Assistant on your Mac and from the menubar select Action -> Download Windows Software. This will download necessary Windows drivers to a folder named WindowsSupport.
Remove all unnecessary drives connected to your Mac, I suggest removing all the portable disks to prevent accidentally formatting them. Now connect your portable SSD or flash drive to your Mac. Open Disk Utility. From the left panel select your portable SSD/USB drive (not the partitions, click directly on the name) and click Erase.
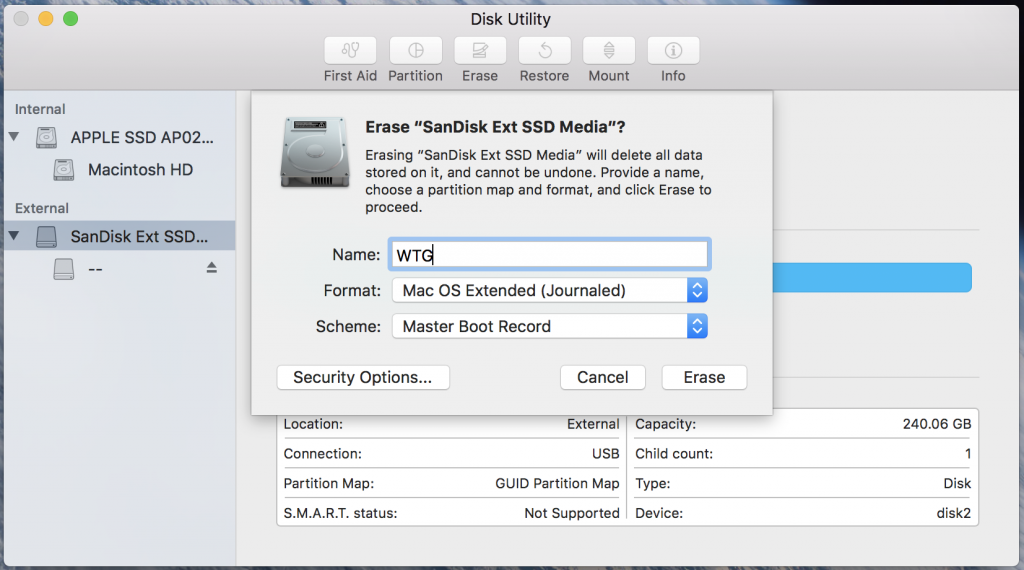
Name: WTG
Format: MacOS Extended (Journaled)
Scheme: Master Boot Record
and click Erase. If the operation fails, try again.
Note the device name. It is stated as Device: disk(number). In the screenshot above it is disk2
Now right click (or Option+Click) to the WTG partition you have just created and select Unmount. Continue to the next step.
Creating a Raw Disk Access File
Open up the Terminal.
Change disk2 with your device name and paste this command:
If you will use VirtualBox:
sudo VBoxManage internalcommands createrawvmdk -filename "bootcamp.vmdk" -rawdisk /dev/disk2
If you will use VMWare Fusion:
/Applications/VMware\ Fusion.app/Contents/Library/vmware-rawdiskCreator create /dev/disk2 fullDevice bootcamp ide
Now you can see that file named bootcamp.vmdk is created in your home directory.
Go to disk utility and unmount the WTG partition again (if it is mounted). Next, we will allow everybody on the computer to access this file (to make it easier to work):
sudo chmod 777 bootcamp.vmdk
Next step depends on the virtualization software you want to use.
Creating Oracle VirtualBox Virtual Machine to Install Windows 10 Directly to the Disk (Option One)
If you have chosen Virtualbox, let’s create our virtual machine.
Start Virtualbox as root by pasting this command on the Terminal:
sudo /Applications/VirtualBox.app/Contents/MacOS/VirtualBox
Click New to create a new virtual machine.
Select a Name and select Microsoft Windows as type and Windows 10 64bit as the version.
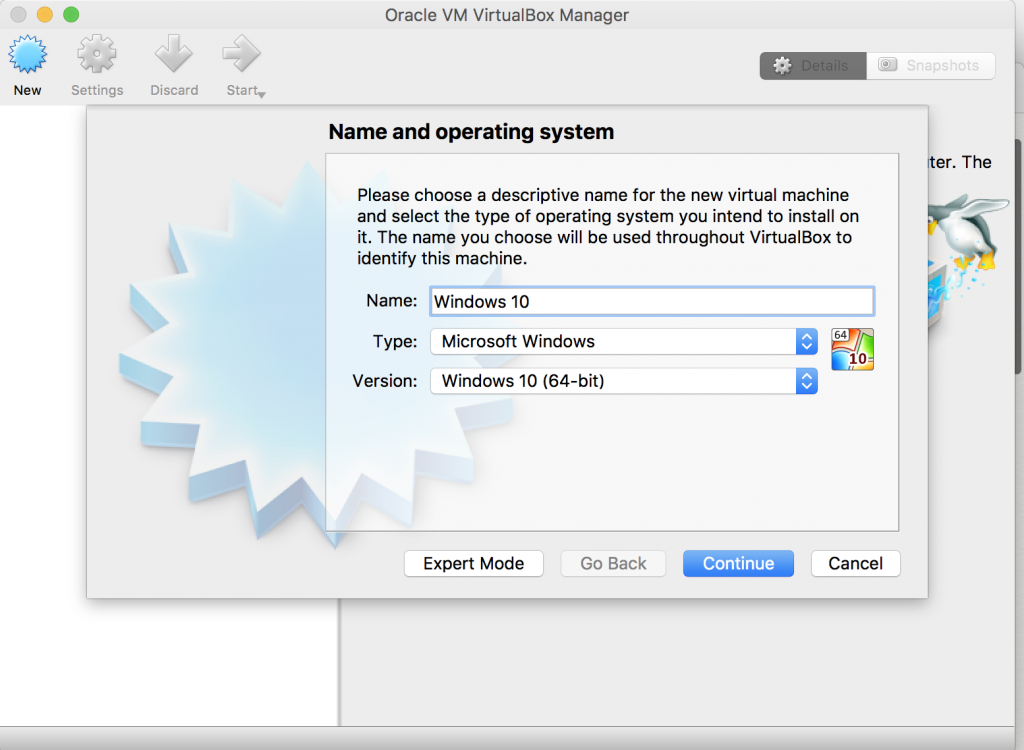
Click Continue, set a proper memory (you need to set 2048 MB or more, it is the minimum system requirement for Windows 10 64bit), click Continue.
On the Hard Disk page select the “Use existing virtual hard disk file.” option.
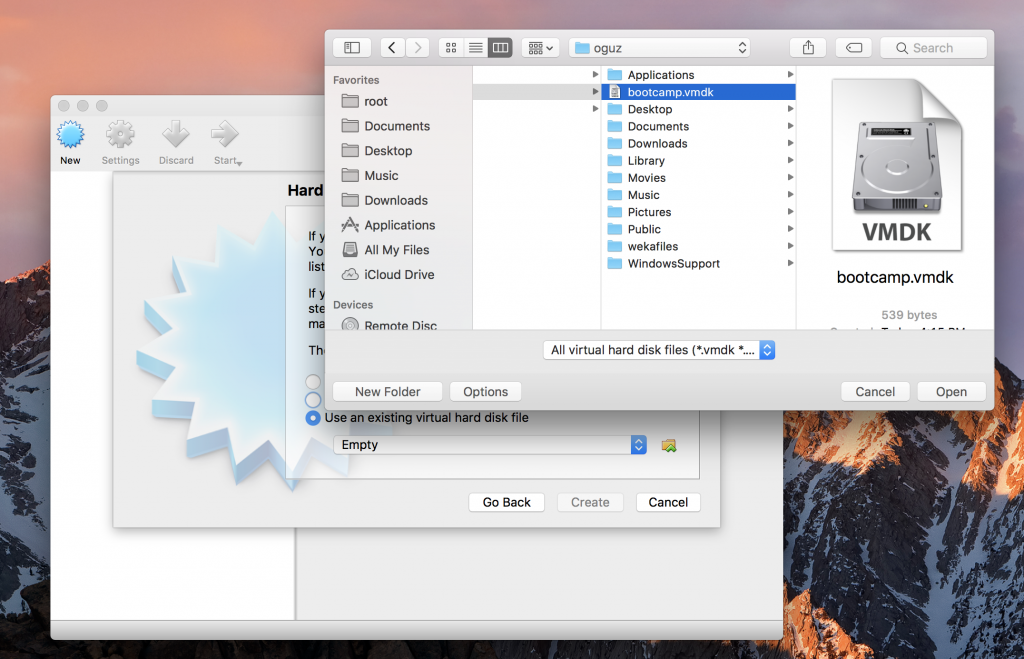
You should select bootcamp.vmdk file we have created. It is under /Users/(your username)/ (you can change location to Macintosh HD from the selection list on the upper side of the window)
Click create when you are done.
Now you can see the virtual machine you have just created on the left side. Right-click on it and select Settings.
Go to System Tab, in the Motherboard section make sure that “Enable EFI (Special OSes Only)” is enabled.
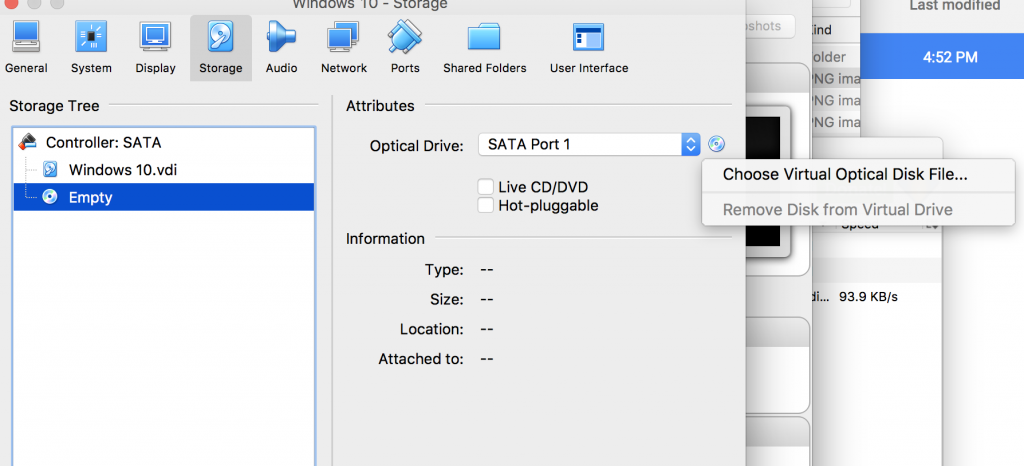
Go to Storage Tab, select Empty from the left (with optical disk icon) click the optical disk icon on the right, select “Choose Virtual Optical Disk File” option and then select the Windows 10 ISO you have downloaded.
Click OK, save the settings.
Creating VMWare Fusion Virtual Machine to Install Windows 10 Directly to the Disk (Option Two)
Open VMWare Fusion.
Use Shift+Command+L to go to your Virtual Machine Library and select Add->New to add a virtual machine (if it is your first start you are already on this screen)
Select Create a Custom Virtual Machine.
Select Microsoft Windows -> Windows 10 x64 from the list. Click Continue.
Select “Create a new virtual disk.” (We will add the one we have created later), Continue and Finish the wizard. (You can directly go to Settings if this option is available)
Save the virtual machine to the desired location. (I named it SSD.)
Shut down the virtual machine if it starts up automatically by selecting Virtual Machine -> Shutdown from the menu bar (click the virtual machine windows first).
Go to your Virtual Machine Library (Shift+Command+L)
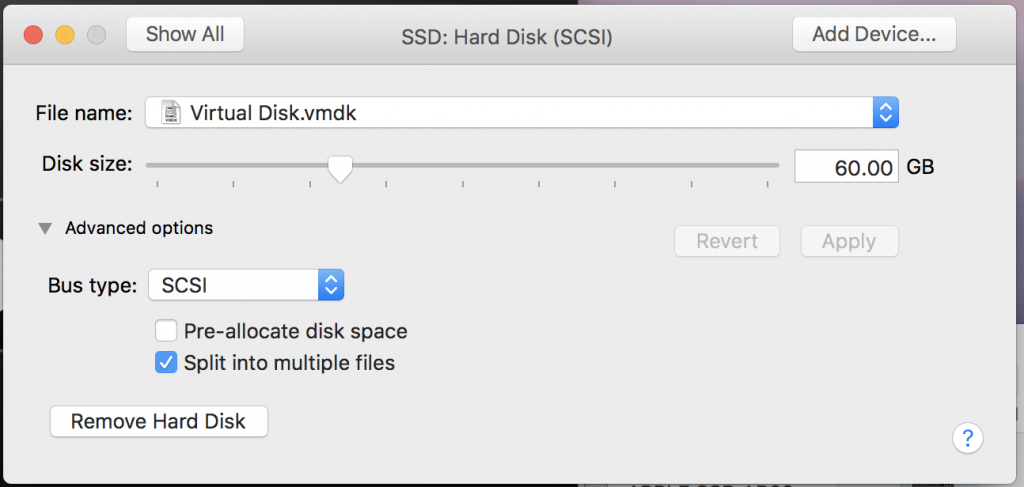
Right click the virtual machine on your virtual machine library and select Settings -> Hard Disk (SCSI). Click “Advanced Options” and click “Remove Hard Disk.”
You can move the old disk to trash, it is not necessary.
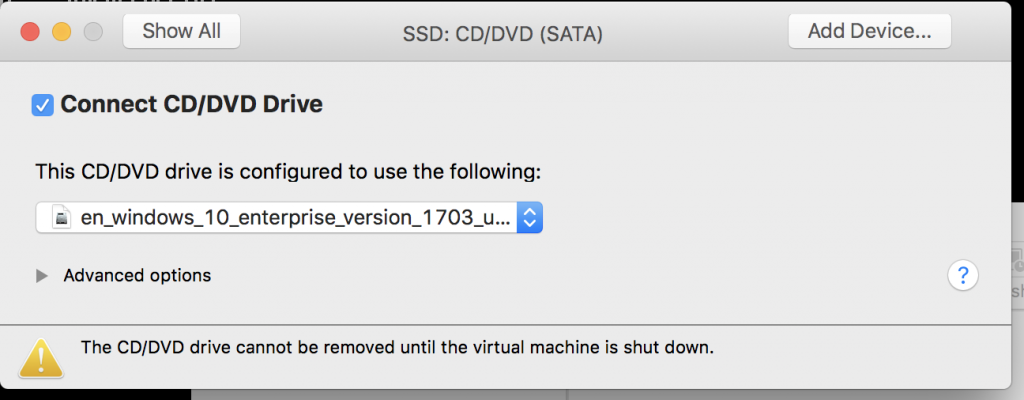
Go back to settings, select “CD/DVD (SATA)” and enable “Connect CD/DVD drive” option. Select the Windows 10 ISO file.
Close the settings window and go back to virtual machine library.
Press Option Key and right click to the virtual machine you have created (while still pressing the Option key) and select “Open Config File in Editor”
Add these lines to the end of the config file and save:
ide0:0.present = "TRUE"
ide0:0.fileName = “/Users/oguz/bootcamp.vmdk"
ide0:0.deviceType = "rawDisk"
suspend.disabled = "TRUE"
Do not forget to change oguz with your username.
Also add this line if you are using VMWare Fusion version 7 or earlier:
firmware = "efi"
Now you can start your virtual machine. If it cannot find the disk file, select bootcamp.vmdk in your home folder.
Let’s Install Windows 10
There is one single step left. Installing Windows 10. But we will do that as we do on a physical computer.
First of all, open Disk Utility and make sure that WTG partition is unmounted. Then start the virtual machine.
It should say “Press any key to boot from CD or DVD.” Click the virtual machine window and press any key. (If you have missed, restart the virtual machine). Windows setup screen should be loaded.
When the language selection screen comes up, click the virtual machine window and press Fn Shift and F10 keys at the same time. (If you are using F1,F2… keys as function keys don’t press the Fn key)
It should pop-up Windows command prompt. We need to clean the disk and convert it to GPT before installing.
Enter these commands line by line:
diskpart
select disk 0
clean
convert gpt
clean
exit
exit
Set your keyboard layout, click Next and Install Now. Select “Custom: Install Windows only (advanced)” as the installation type.
On the disk selection screen, do not create new partitions or erase the disk, just click Next. Complete the installation. (Some old Windows 10 versions require you to close the virtual machine before the first boot – after your machine will restart in 10 seconds message is passed (or after you clicked to Restart button), close the VM and boot directly from the external USB disk.)
Complete the initial configuration, install VMWare Tools (Menubar – Virtual Machine-> Install VMWare Tools) or Virtualbox add-ons if you like.
I suggest copying Windows Support Software (WindowsSupport folder you have downloaded via BootCamp Assistant) to the virtual machine, you can even go to $WinPEDriver$ folder and run DPInst.exe in each folder to install mouse and keyboard drivers.
When you are finished. Power off Windows (and the virtual machine)
Boot Windows 10 From The External USB Drive
Shut down your Mac. Press the power button and keep the Option key pressed to bring boot device options. Select the external drive and you will boot from the USB drive.
If trackpad and keyboard do not work, use external USB mouse and keyboard. They will work after installing BootCamp drivers.
Copy WindowsSupport folder you downloaded from Bootcamp Assistant and run Bootcamp/Setup.exe and install BootCamp drivers.
Does It Work On Other Machines?
As long as the other Windows PCs or Macs have UEFI that can boot from external GPT volumes, it should work. So you can use the portable SSD or removable Windows To Go drive on every modern PC. But you might need to install extra drivers.
A Final Note
Please update Windows 10 completely before updating BootCamp drivers via Apple Software Update. Windows somehow detects BootCamp executable as malware and blocks it if you don’t.
✓ᵛᵉʳᶦᶠᶦᵉᵈ
Can you update this for latest Debian 9 stable? UltraVNC is freezing and crashing.
https://www.digitalocean.com/community/tutorials/how-to-set-up-vnc-server-on-debian-8
David Majchrzak
Hi! Have you had any issues updating windows 10 on the External USB Drive? I’m more or less stuck with it saying it doesn’t support windows on external usb disks.